Saturday 21 May 2011

Website...

We have to create an online portfolio as part of our final project. I have bought the domain name: jessiewilliams.co.uk

I have stuck to the same design as my business cards to keep everything very coherent...

I am using graph paper as a background, which I can tile...

I am using my name in Helvetica as an image, but the text underneath will not be an image. I want to use as few images as possible. Although there will obviously be a lot in my portfolio!

I only want to main pages on my website... A portfolio page which will be the home page and an about/contact page. The portfolio page will have thumbnails displayed - each thumbnail will take you trhough to a project or client, so there will be various images/video material the other side. I think I want to do this as a lightbox, but I'm not sure if I will be able to actually do this!

Here are my original designs:

This is the portfolio homepage (The thumbnails will be filled with images I make to represent each project)

The about page will literally state my contact details and a brief description of who I am and what I do...

My website is super simple and uses html and css. I have cut out a small section of the graphed paper so it tiles, this helps the site load quicker...

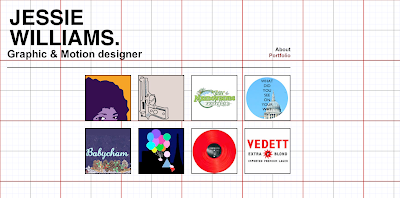
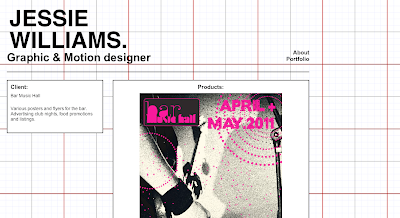
The homepage is the main portfolio page with a series of thumbnails of each client or project. When the user clicks onto a thumbnail it will take you through to a list of images of work for that particular project or client. It will have a left white box with a brief description of the project.

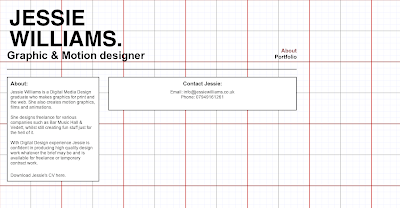
The about page states contact details, a brief description of what I do and a downloadable PDF of my CV...

Below are screen shots from my finished website...
Portfolio homepage:

Inside a client/project:

About page:


I have uploaded all the files to my hosting site and now the site is live! I have also added an email address to my domain - info@jessiewilliams.co.uk

View the site here:

CV...

For part of our final project we have to re do/update our cv's. I have made a nice simple, clean CV, easy for employers to skim through. I have included a picture as a lot of jobs I have applied for i the past have requested one along with the application...

Business cards

I looked into getting some foil blocking on my business cards (Text is embossed and printed with foil) BUT it was way too expensive! I wanted something super simple, that matched my online portfolio and was something different. I decided for my cards and website I wanted a simple graph paper background with my name or logo in a black Helvetica. I wanted a short description of what I do and my name and my url.

I decided that a standard business card size wouldn't do for me, I think they don't stand out and I would like another shape. Instead of getting my cards laser cut (too expensive) I would halve the size, so they almost like little tickets!

Here is my final artwork for my cards...
Front:
Back:

I really like the simple and minimal style. I received them yesterday and I love them! There no foil blocked cards but they'll do!

Exhibition picks!

We had to put all our work forward that we wanted in the show. I was quite selective of what I wanted to in it. I eventually selected my:
  • 3 easy pieces
  • YCN
  • Packaging design
  • One of my Meadowlands virals
  • Film Noir poster
  • My Handmade Babycham animation
  • Some posters for the bar I work in
Our tutors narrowed all of our work down, so now i will be showing:
  • 3 easy peices
  • Meadowlands viral
  • Babycham advert
  • and complete YCN project
I am getting my YCN Thames Clippers floor stickers actually made into genuine floor stickers. They will be printed onto Vinyl and matt-laminated and cut circular, these will stick to a concrete surface and can be removed fairly easily after the show...

Me and Harry made a showreel for all the ba's motion graphic work, this will be shown at the beginning of our videos on a projector at the show. We have included snippets of everyones work that we thought should be shown in some way, even if it didn't make it into the show as a whole. I picked a Death in Vegas track called Dirge as the soundtrack... Final showreel below...


Wednesday 6 April 2011

Editing Stop Motion

I had all my shooting complete. I then started to put them together. I started by putting all the photos in final cut pro. I did one layer with the person stop motion and put them in order, i then changed the duration to around 0.2 seconds on each photo. I added a new layer and did the same with the backgrounds. I played around with the duration, I also repeated some of the shots in places to balance out timings with the backgrounds.

I then added sound, I chose Tall Ships tracks for 2 of the stop motions, their very fast and upbeat and match the stop motions really well. I used Penguin Cafe Orchestra for one also.

I then had to play around with the sizes and sort out the endings of the films, they ended really abruptly in sound and visuals. I exported the movs and imported them into After Effects to place into the correct size. I had some problems with Jays stop motion, the flowers were so built up they had gone of the side of the camera so I added 2 white blocks either side. At first I made a fuzzy edge in Photoshop but I don't think it suited the feel and preferred just a plain white, I added a white block behind the other 2 too.


I played around with the colour in After Effects too, they now look a lot brighter and 'fun'


I then faded the films (and audio) out to white and will place Marie's butterfly Meadowlands ending on the ends...

Shooting Stop Motion...... Part two.

So, I had finished all of the first part of shooting. Then came the hard part! The stop motion on walls!

I made lots of little props that I would be moving around on a wall. I made them out of felt, paper, card, tin foil, you name it! I made things like clouds, lightening, sunshine, MEADOWLANDS words, flowers and even rain.

I moved my whole living room around so I had enough space to shoot. I then slowly started acting out a scene on the wall with my props. Using blue tack, moving a cloud along a little, taking a pictures, and repeated until I had finished the whole story! The rain took the longest and was really tedious, moving each rain drop one at a time is not fun!


I did 2 different stop motions, one for the stop motion with 3 people in and one for the stop motions with one person in.

Monday 4 April 2011

Shooting stop motion.... Part one.

I have decided to shoot my stop motions in two parts, part one will be shooting the actual people and then I will shoot the stop motion backgrounds separately. This will make shooting the people a lot easier! It won't take such a long time which means the shoot will run smoother. To do this I will need to shoot the people with plain backgrounds which will be deleted, to make this work I need to make a make-shift green-screen.

I bought some very bright orange fabric which can be hung behind the people, I was originally going to shoot on plain white backgrounds but decided I would get white highlights on faces etc which would cause a problem...

The first shoot I did was with 3 guys sitting on a sofa...

I lit the backdrop with lamps...

I then got the guys to keep swapping hats whilst I was taking photographs...
I then introduced sunglasses and kept swapping them...
and then gradually flowers until they built up all over them...
The whole idea of the film is to start gloomy and rainy with glum faces, then as the birds and flowers start to appear its all about how fun Meadowlands is!

The shoot took quite a long time, it actually took longer setting it all up than actually taking the photos, I made sure everything was ready to for when I started so the boys didn't move around a lot.

I had the same appraoch with my other 2 shoots.... I did one with Lolly and another with Jay.

I wanted to have a variety of people shown in the films. I am so glad I have finished the filming of the people for stop motions! I am sick of carrying round a shopping trolley full of fake flowers, birds, hats and sunglasses!

I then had to start on deleting all the orange backgrounds in the photographs. I did this using colour range in photoshop and using actions....

I did each set separately until I had transparent backgrounds.

I started with the normal photo...
Started to record an action. I then opened colour range and selected a part of the orange...
I had to turn the 'fuzziness' right down so it wouldn't pick up anything I didn't want it to, like oranges in the flowers or birds.Then hit delete! I did this a few times and then stopped recording.


I then ran a batch on the folder full of the images with orange backgrounds so I didn't have to repeat the process hundreds of times!
I had to run several actions as it still didn't pick up of all of the orange...

I then had to go through the pictures individually and erase smaller blemishes, for example in the photo below, the tape that was holding the fabric up was in shot!

This was probably the most time consuming bit of work I have ever done! Especially for 3 separate films! It took such a long time, even though colour range tool is good, I had to run so many actions to make it work with so many bright coloured flowers in shot too. EVENTUALLY i ended up with all shots of all sets with transparent backgrounds!

After a VERY long time on Photoshop and hundreds of folders of thousands of pictures, they are done!